MOVEMENT & BALANCE EXERCISES
This is a much-neglected area of training. Without proper balance and movement, the techniques involving the weapons will be much harder to perform with any effect. Some of the suggested exercises are nothing like fighting, but they do teach some important aspect of movement and balance.
During all of these exercises, it is important to use the hands and arms for balance, and to lead or emphasize movements. If the hands and arms are used this way, they help train the upper and lower body to work together. Do not allow students to perform these exercises with their arms in the positions used to hold a sword and shield.
3-Step 'U' Walking. (Also using hands)
In this exercise, the student moves sideways, with their feet moving to form a "U" every three steps, with the opening of the "U" turning 180 degrees during the steps. The turn alternates clockwise and counter-clockwise. The steps are shown below in Diagram 1. The arrow with the solid point is the right foot.
| |
Diagram 1
 |
|
In the starting position, the feet are parallel, both facing to the top of the page.
1. The right foot doesn't move. The left foot is placed horizontally, toe to the right, heel next to the toe of the right foot.
2. The left foot doesn't move. The right foot moves to a vertical position, toe down, heel next to the toe of the left foot.
3. The right foot doesn't move. The left foot moves to a vertical position, toe down, parallel to the right foot.
For steps 4, 5, & 6, repeat steps 1, 2, & 3, moving back to the starting position. In steps 4, 5, & 6, use the directions from the corresponding steps, but with the opposite feet.
6-Step Turn Walking (Also using hands)
In this exercise, the student moves forward, turning in a circle every six steps. While moving, the student must remain balanced, with his or her weight evenly distributed. Be careful not to lean forward or backwards, and when executing a turn, pull the hands in towards the chest, so as not to acquire unwanted rotational momentum.
Diagram 2 below illustrates the positions of the feet during each of the six movements. The arrow with the solid end is the right foot.
| |
Diagram 2
 |
|
In the starting position, the feet should be in a normal fighting stance facing an imaginary opponent. The hands should be held in an approximation of a boxing or Karate guard position, with the left hand extended somewhat.
1. The right foot advances, ending in a position ahead of, and diagonally across towards the shield side of the left foot. The hands change position, with the right hand extending, and the left withdrawing.
2. The left foot swings around the back of the right foot to the sword side, ending more advanced towards the opponent than the right foot, with the left heel pointing at the opponent. The hands maintain the same guard position, and the student should continue to face the opponent as much as possible, viewing over the right shoulder.
3. The right foot moves straight towards the opponent, ending up parallel with the left foot, but more advanced toward the opponent. Both feet are pointing away from the opponent. The hands maintain the same guard position, and the student should continue to face the opponent as much as possible, viewing over the right shoulder.
4. This is the tricky move. The left foot swings as far as possible around counter-clockwise towards the opponent. During this motion, the body and head must turn around so that the opponent is being viewed over the left shoulder. During the turn, the hands are drawn in to the chest, and extended again into the guard position, left hand forward, as the turn is completed.
5. The right foot swings around counter-clockwise, advancing further than the left foot, with the toe pointing towards the opponent.
6. The left foot moves straight towards the opponent, ending up parallel to the right foot, but more advanced towards the opponent. This is the starting position.
Emphasize smoothness of motion, controlled commitment, and proper balance. Speed is not a part of this exercise, but students should learn the technique well enough to move in an even flow.
Sideways Walking (low and high)
This is an important exercise, since the movement is the one most used in actual fighting.
When advancing towards (or retreating away from) an opponent, I will use both a slide step with the front foot (or back foot, in the case of a retreat), and a "striding" step with the back foot (or front foot, in the case of a retreat). I prefer this to the method generally used in modern fencing, where the front foot advances, and the back foot is recovered forward to the approximate former position of the front foot. I believe that it provides more range, and is more suitable to the "fighting in the round" format of armored combat.
However, when moving, I do not wish to commit to a particular motion with each step.
Therefore, I avoid stepping forward with my heels striking the ground first, and with my weight already moving onto the foot before it lands. Instead, the point of the foot that hits the ground first should be the rearward edge of the ball of the foot. (When the front foot steps forward, this is the inner edge. When the back foot steps forward, this is the outer edge.) I then slide my weight forward, as if the toes of the foot were gripping the ground and pulling me onto the foot.
It is also important to bend your front (or back) knee when your body passes over it on its way forward or back. If you don't, you will "bob" up and down with each step.
In like manner, it is important that you lead your movements with your hips, not your shoulders. This will allow you to avoid leaning. This is especially important while moving forward, for it avoids what I call the "Rocky Balboa" style, which is leading with your head.
Using these techniques will reduce unwanted commitments to particular directions or motions. In addition, the additional flex that the method allows to the foot and ankle can be useful in quickly changing directions, or retreating.
The exercise itself is easily performed. The best training aid for it is a four-in wide line painted on a flat surface (such as found on highways or in parking lots).
| |
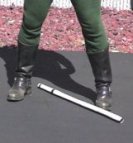
Figure 10a |
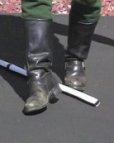
Figure 10b |
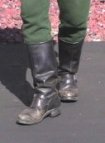
Figure 10c |
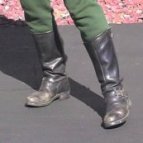
Figure 10d |
|
- Take a proper stance, with the line passing front-to-back between your feet. Your front toe should be touching the line on the shield side, and the heel of your rear foot should be either touching the line on the other side, or be up to four inches away from it. Please see Figure 10a, above.
- Keep your hands spread out to the sides for balance. Do not pretend that you are holding a sword or shield.
- Walk forward;
- Don't let your heels touch first. Keep most of your weight on the balls of your feet.
- Keep your feet at about a 30-degree angle from the line. Don't allow either foot to point straight along the line, or straight to the side.
- Keep your feet in their respective positions relative to the line. Don't cross over.
- Remember that the initial point of contact with the ground is the rearward edge of the ball of the foot. Roll your weight onto the ball of your foot as your body moves forward. Please see Figures 10b, and 10d above.
- Bend your front knee as your body passes over it. Avoid "bobbing". Please see Figure 10c, above.
Start doing the exercise in a normal fighting stance. When you're proficient, practice moving backwards, or when using a very low and wide stance.
Forward scallop walking (low and high)
| |
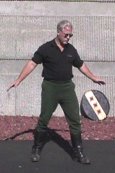
Figure 11a |
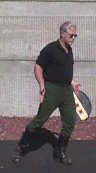
Figure 11b |
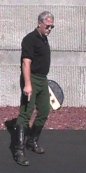
Figure 11c |
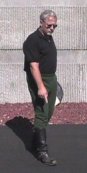
Figure 11d |
Figure 11e |
|
This is an exercise that I use for people who are having trouble with over-committing forward when they step. The exercise requires that the weight be moved to the forward foot, with a pause before the step continues. This allows the student to re-establish his or her balance just before the step. During each step, the back foot, with its toe pointed and extended, moves along a curve away from the body to the side, then back to the front, where it touches the ground, toe first. (Don't worry about placing the foot as described in the Sideways Walking exercise.) Since the foot, through most of the step, is not in front of the body, the student is not as tempted to lean forward. Again, use the hands as described below, and do not pretend as if you're holding a sword and shield.
To perform the exercise:
- Start with the feet roughly parallel, with the shield foot in front at least the length of the foot. Please see Figure 11a, above.
- Use both arms to make a pushing motion, first reaching comfortably far back, then coming forward close to the body at hip level. Please see Figure 11b, above.
- At the same time, push forward with the back foot, so that your weight is transferred to the front foot, and you come up onto your right toe.
- Pause.
- Point your sword hand at your right foot.
- At the same time, slightly extend your shield hand for balance.
- At the same time, slightly bend your front knee.
- Move the foot through the curve described above, pointing at it with your sword hand. Please see Figures 11c and 11d, above.
- When the foot reaches its destination;
- Pause.
- Tap the toe.
- Move your hands through the same pushing motion described above to move your weight onto the front foot, coming up on the toe of your back foot. Please see Figure 11e, above.
- Pause.
- Point at the back foot, and continue as above.
Power Pushing
| |
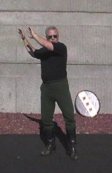
Figure 12a |
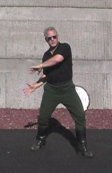
Figure 12b |
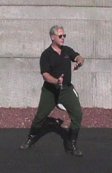
Figure 12c |
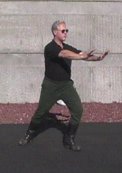
Figure 12d |
|
This is an exercise that I use to help students to learn to focus power through visualization combined with physical movement. In general, the exercise involves moving forward in a "herringbone" pattern, moving from a back stance to a forward stance on each step, while reaching back and pulling a visualized ball of energy past the side of the hip, and pushing it into the distance. It is important to move as if you are really moving a large, glowing ball, which is not heavy, but has some resistance to being moved forward. Once it starts going, imagine that it accelerates.
To perform the exercise:
- Start in a normal stance.
- Visualize the air behind you becoming thick, and glowing with energy.
- Turn your head and upper body towards a point about 45 degrees to the right of front. At the same time: (Please see Figure 12a, above.)
- Shift your weight to your left foot until about 80% of your weight is on it.
- Extend your left leg slightly, so that you stand up a little higher.
- Pull your right foot in slightly, so that the knee is bent, and only the toe touches.
- Reach your arms back to your left side to grab a ball of the energy that you have visualized behind you.
- As they go back, both hands should quickly move as high as possible, then, with both hands open with the palms facing forward, scoop down to gather the energy.
- The hands should continue down and forward with the curve, pushing the visualized ball of energy past the left hip. (Please see Figure 12b, above.) As the hands move forward:
- The body's weight should start to shift forward toward that 45-degree angle.
- The right leg should extend in that same direction.
- This should continue, with the weight of the body moving forward as the ball of energy is pushed towards that 45-degree angle.
- The left leg should extend to help with the push.
- The right leg should bend as the weight moves onto it. You should end up in a forward stance, with about 60% of your weight on the right foot.
- As your arms extend, the palms should remain open to the 45-degree angle, and the both hands should rotate clockwise until the fingertips are pointed up, at almost full extension. Please see Figure 12c, above.
- As the arms finish their extension, which should be at the same time the weight shift is completed, push the energy towards the horizon. Please see Figure 12d, above.
- Start again at the "Turn your head and upper body---" step, and do the same thing towards the 45-degree angle direction on the other side of forward (315 degrees, if front is 360).
|
)
)
)
)
)
)
)
)
)
)
)
)
)